Subscribe to
Posts
Comments

Top Ten From VeraNadine.com

“Then I heard it! It was silently beautiful, my soul song. The universe within, humming like a waterfall. Pulsing. The heart of love.”

~Vera Nadine, Inspirational Writer and Spirit Channel

Vera Nadine

It’s always so lovely and enjoyable for me here on Vegetarian Frugal Housewife. I love bringing you fun and creative ideas that you can play with and enjoy at home.

Over at my main blog, I enjoy working to bring you exciting and inspiring posts about spiritual development, meditation and metaphysical topics.

If you’ve never checked out Vera Nadine, I invite you to pop over and explore it now. There is a wealth of information there, including spiritual guidance based on my own personal experiences.

Spirit is in you, and in everyone. Many of us who are embracing more healthy living, closer connections with nature, activism and community building, are also looking for ways to deepen our inner connection with spirit and the creative source.

The free articles and downloads at VeraNadine.com are intended to help you understand and open up to the realms of spiritual awareness so that you can live a more peaceful and inspiring life.

Here are the top ten posts from VeraNadine.com to help familiarize you with the site:

While you are visiting the Vera Nadine blog, don’t forget to submit your questions, as she will be giving readers free guidance by channeling answers to submitted questions and posting them as Q&A blog articles.

Also, everyone who submits a spiritual question will be entered in my monthly drawings for a free private reading!

Thanks to all of you for supporting my work, both here at Vegetarian Frugal Housewife and at Vera Nadine!

In Praise of Temporary Sculpture

“A snowball is simple, direct and familiar to most of us. I use this simplicity as a container for feelings and ideas that function on many levels. ”
~Andy Goldsworthy, Environmental Sculptor

Andy Goldsworthy

When we are talking about art, and we are talking about frugality, we should definitely be talking about Andy Goldsworthy.

His art is something that bridges the gap between both art and eco-friendliness but also speaks to us of other, perhaps more important, concepts like innocence and spirit.

Andy Goldsworthy, a British Sculptor who does some fantastic site-specific sculpture using natural materials found on location, has such a unique style. His work is transient, deliberately and most naturally temporary, lasting only so long as the winds, the seas, gravity or mankind allow.

He takes his inspiration from the colours and textures in the landscape, from the patterns so common in nature herself, and he delights in transmuting things from their ordinary form and function into something equally natural but yet astoundingly different.

Andy has been working since the seventies, when his disagreement with the restrictive programme at his art college led him to seek solace in the real, in the inspiring. In other words, in nature.

To look at some of his early works check out the online catalogue at Glasgow University’s website. Or if you’d like to watch a documentary about his more recent works, check out Rivers and Tides.

Leaf Mosaic

Since his beginnings Andy has become renown for his distinctive and ephemeral brand of landscape art, encompassing pre-dawn ice sculpture, beach sculptures that just barely beat the tide and leaf collages which tempt the fury of the winds.

There is something so sacred and yet so human about his type of artwork. It makes a beautiful and terrifying statement about the way in which man has such a great, and yet such a fleeting, effect on his environment. His pieces remind us of our divinity and our own mortality.

Pebble Mosaic with Hole

Andy’s casual, quiet nature, as well as his somewhat reclusive lifestyle in the Scottish Highlands, has left much room for new artists to follow his lead and, over the years, many have. But only one really deserves mentioning in the same arena as Goldsworthy, not necessarily for the grand scope of his works but for his similarly spiritual and unassuming approach to his craft. And that is Shane Hart.

Hart’s impromptu art, a precarious balancing act between upright stones that seem to have no right to defy gravity, has been given the name of Uppala Yoga. And it is certainly rooted in the philosophy and peaceful grace of yoga.

The uppala stone sculptures present elegance in the face of resistance, defying gravity with an awe-inspiring simplicity. To stumble upon one of his works unexpectedly would certainly challenge our own impressions of what is possible and what is divine.

Shane Hart at Work

All-in-all I am enamored of those who can, from found natural materials, channel through their unique spirit an original piece of low-tech art that showcases the innate magnificence in all creation.

The spiritual beauty in accepting, and even embracing, their art as temporary and transitional is what is most moving, and like all good art it speaks to that silent something in our human core which defies explanation. Now THAT is real art, here today, gone tomorrow yet leaving us with a splendid feeling and a memory that will last forever.

Yarn Fun for Autumn

“Delicious autumn! My very soul is wedded to it, and if I were a bird I would fly about the earth seeking the successive autumns.”
~George Eliot i.e. Mary Anne Evans, 19th-century British Novelist

Meander Scarf

Here in England the autumn is rolling in quite quickly. By far my absolute favorite season, it has that crisp, heady smell on the breeze.

Something about the autumn makes me long for the traditional, for the comfortable and cozy. I guess that growing up in Massachusetts somehow the autumn (or the fall, if you please) became acquainted with history and family traditions like Halloween and Thanksgiving.

It seems that I have such a happy flutter in my heart when this time of year dawns and I feel the need to pull out heavier blankets, my wool cloak, long novels and YARN! Yep, that’s right. I have been bitten by the autumn crafting bug a bit early this year! And being as we left all of our lovely knick-knacks and craft supplies at our apartment back in the U.S., it has been difficult to get my hands on some yarn and good knitting supplies at such short notice.

Before we set off to explore Europe and work on some of my spirit channelings, I was in the process of taking my knitting to the next level. I was graduating from afghans and scarves to baby sweaters and socks. My intention was to then get to learning fair isle and intarsia. So all of those rather groovy and expensive supplies are waiting for me, in limbo, back in Massachusetts.

When we are going to move back to North America, or whether we will at all, remains to be seen. So for now I simply NEED to get some knitting done but don’t want to spend a whole lot of MONEY to get that achieved. Frugality is key folks.

I am sure lots of readers, and crafty persons, out there are wondering about making gifts for friends and family this year, since the whole world seems to be sinking into an economic recession. For me the answer was the dollar store (or “pound shoppe” as they are called in Britain.)

Having to compromise my values about free trade and natural fiber yarns was not easy for me, but I figure it is just for a while and, in this economy, frugality sometimes wins out over my politics…not often, but sometimes. In general I do not agree with plastics of any kind and I agree even less with my money going to something that was made in China. I did manage to find yarn that was made in England, but it is, unfortunately acrylic.

The fiber shop here in town wanted ₤8 ($16) for their cheapest ball of natural yarn, with only 100 meters of length. That being said, at the pound shoppe I got ₤3 ($6) worth of acrylic yarn and ₤2 ($4) worth of not-so-great knitting needles. For ten bucks I got 900 meters, enough yarn to knit 3-4 scarves or maybe 5-6 winter hats. If you try Ebay you may be able to find some luscious alpaca or mohair yarn for an affordable price, but certainly not enough to make any really BIG projects.

Most people do not like the feel of that cheap acrylic yarn close to their skin. This is easily remedied by using some fabric from an old pair of pajamas or old t-shirt to line the finished item. You do this by laying the item down on a paper bag and drawing an outline of it, this makes a template for cutting fabric.

For a scarf, make a template of 1/4 or 1/3 of its length and then just cut out and sew together the correct number of pieces to line the whole scarf. For the hat, cut out a pattern for 1/2 or 1/4 of the hat and then sew them together as above, make sure that you use a somewhat stretchy fabric for the hat lining.

Then you place the fabric and knitted item, with wrong sides together, and use a matching color of thread to sew the edges together, tucking in about 1/4 inch of fabric along the edge as you sew. This creates a nice finished edge and keeps the fabric from fraying during normal use.

Marijke Scarf

So, just for fun, here are a couple of free scarf patterns that you could use to make some quick scarves as gifts, I’m using both of these for my current projects. Plus, think of all the relaxation and enjoyment you get just from knitting them up. If you like, you can always donate them to charity.

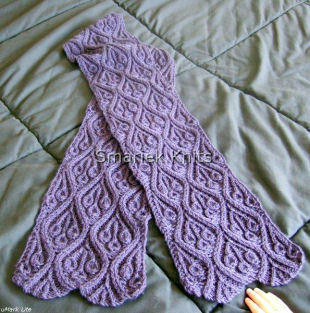
Marijke Scarf *pictured right*

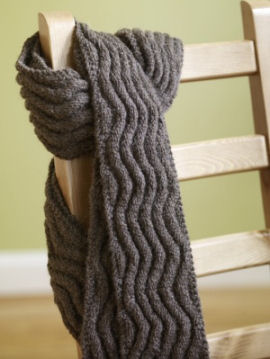
Meandering Rib Scarf (registration required for free pattern) *pictured above*

These scarves would also come out great in multiple colors and weights of yarn, so get out that scrap box and get knitting!

Vegetarian Singapore Noodles

“If more of us valued food and cheer and song above hoarded gold, it would be a merrier world. ”
~J.R.R. Tolkien, British Author and Linguist

Vegetarian Singapore Noodles

Last night I finally attempted one of my favorite Asian dishes, Singapore Noodles. Usually served in Thai and Chinese restaurants, Singapore Noodles tend to have multiple types of meat in them, such as chicken strips, pork shreds and whole shrimp. This version has most of the regular ingredients that you find in the restaurant version, sans meat.

This dish is fun, quick and brightly colored, making your table look very enticing and exotic. You can pair it with tofu satay, vegetarian spring rolls or even steamed dumplings if it strikes your fancy.

Two word of advice:

1) This uses a lot of curry powder, if you tend to have heartburn, rethink eating this dish.

2) Make sure that your rice noodles are from Japan and not China. In my experience the ones from China cook up differently and don’t attain the correct texture…you will end up with yellow spaghetti if you don’t use Japanese Noodles. ;)

Always feel free to make replacements for some of the veggies called for in the recipe, if you don’t have the exact ingredients. The restaurant is your own kitchen which means you have free reign over experimentation.

    Vegetarian Singapore Noodles
    Makes: 3-4 servings
    Prep Time: 30 minutes

    Ingredients:

    Noodles-

    250 grams of rice noodles (1 package)
    2 cloves garlic, chopped
    1-inch piece of ginger, shredded
    1 red bell pepper
    2 green onions, (scallions) chopped
    1 handful mung bean sprouts
    1 cup dried Asian mushrooms
    1 small onion, diced
    1 small carrot, shredded
    6-8 leaves of Napa Cabbage or Bok Choy, cut small
    1 handful Pea Pods, whole or chopped
    6-8 small chunks of pineapple, cut in half
    4 tbs Nama Shoyu Soy Sauce
    1 cup warm water
    6 tbs sesame oil
    1 tsp salt

    Sauce-

    1/2 cup coconut or soy milk
    1.5 tbs curry powder
    1 tbs sesame oil
    1 tsp Nama Shoyu, Soy Sauce
    1 tsp turmeric
    pinch chili powder
    pinch cumin
    1 tbs corn starch

1. Prepare your noodles according to the directions on the package. (Usually they say to soak in warm water for 15 minutes.)

2. Soak the dried mushrooms in 1 cup of warm water mixed with the 4 tablespoons of Nama Shoyu Sauce.

3. Chop, dice and shred all vegetables as noted above.

4. In a separate bowl whisk together all of the sauce ingredients except for the corn starch.

5. Add the sesame oil to your wok or frying pan and fry the veggies, save soft ingredients such as green onions, bean sprouts and pineapple until near the end of cooking time.

6. Remove the mushrooms from their soak water once they have soften and add them, along with any other soft ingredients, to the wok.

7. Cook for another 2 minutes, stirring well and then add the sauce mixture.

8. Stir everything together and add the corn starch to thicken the sauce a bit. Let simmer for a few minutes.

9. Drain your noodles and pour the vegetable and sauce mixture over them.

10. Mix and serve with chopsticks, hot tea, soy sauce and/or sweet chili sauce.

Bon Appetit!

Lemon Poppy Seed Sweet Loaf

“The truth is that life is delicious, horrible, charming, frightful, sweet, bitter, and that is everything.”
~Anatole France, Winner of the Nobel Prize for Literature, 1921

Lemon Poppy Seed Sweet Loaf

Somehow, it didn’t seem appropriate to call this a bread.

I tried that tact when I first made it but Papa agreed that it was far too sweet and moist to be a bread and must, therefore, be a cake.

Still it is often listed as a “bread” in cookbooks, and it is made in a bread pan.

It’s heavier than most cupcakes or iced cakes though, so I went with it being a loaf. The Victorians would probably call it a tea cake. ;)

Admittedly, as a child I hated anything even remotely lemon flavoured. But, oddly enough, as I got older the taste grew on me. I still favor a cherry cake or a zucchini bread over lemon, but occasionally I get a craving for something sweet and lemony.

All citrus flavours seem very refreshing and invigorating to me, but lemon is the most refreshing of all. Even the kids will like this loaf and you may have to beat them off of it like leftover birthday cake.

It does have quite a fair amount of sugar in it but you could substitute agave or honey and still get lovely results. Some people glaze this loaf and some don’t. I do, of course, but you don’t have too. ;)

    Lemon Poppy Seed Sweet Loaf
    Makes: Two Medium Loaves

    Ingredients:

    Loaf-

    3 cups flour
    1 tbs baking powder
    3/4 tsp baking soda
    1/2 tsp salt
    4 tbs poppy seeds
    1/4 cup butter, melted
    1 1/4 cups sugar
    2 eggs
    1 tbs lemon zest
    Juice of 1 lemon
    1 tsp vanilla extract
    1 1/2 cups of lemon or vanilla yogurt
    1/2 cup soy milk
    1/2 cup water * (The amount of liquids you need will vary, just check the consistency of your dough.)

    Frosting-

    1 cup confectioners sugar
    2 capfuls of lemon extract
    Enough lemon juice or soy milk to make the frosting liquid

1. Mix all dry loaf ingredients, except the baking powder and soda, together in a large bowl.

2. Add the liquid ingredients and mix thoroughly until the dough is evenly mixed and not too lumpy.

3. Last, mix in the baking powder and soda very thoroughly.

4. Grease two medium-sized loaf pans and distribute the loaf batter evenly in them. Alternatively, you could use a bundt or cupcake pan instead.

5. Bake the loaf for 30 – 40 minutes at 375° Fahrenheit or 190° Celsius.

6. Remove the loaves and let cool for 30 minutes. Begin making the glaze.

7. For glaze mix all glaze ingredients and be sure that the final result is wet enough to pour, but not too liquid, or it will all run off of your loaf.

8. Be absolutely certain that the loaf is cool to the touch. Warm loaves will cause the frosting to become more liquid.

9. Pour the glaze very slowly over the top of your loaf and let it runs just slightly over the edge.

10. Allow the glaze too harden over the next couple of hours and garnish with lemon peel.

Enjoy this loaf with some nice warm tea or a glass of soy milk. :) Just don’t eat it all in one sitting.

« Prev - Next »