Subscribe to
Posts
Comments

Yoga Stretch

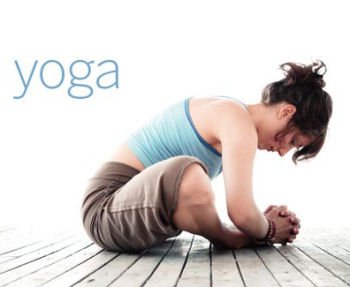
A few months ago I took up yoga, and have so far observed many things about it and about myself. I won’t bore you with the details.

There are two things that apply widely though: you have muscles that you have never dreamed of in places you’ve never felt. And, going with the modern, “women’s magazine,” trendy variety of yoga can be costly. You don’t need ocean views and spa retreats to connect with yourself. :)

In taking up yoga there is some expense involved. The things that you supposedly need are a mat and (if you’re not very flexible) a yoga block, a yoga strap and a bolster cushion. You also need comfy pants, non-slip socks and a tank top. Some of these things I had, some I had to buy (luckily my birthday passed around the same time and I got some nice yoga-related gifts.)

The one thing I did not have was a yoga mat bag. And, being the crafty chick that I am, I decided that I should make one myself. I decided this despite all the ultra-funky and unique yoga mat bags that are available out there.

Now, once I decided to make the bag I set about looking online for a pattern. I’m a frugal girl. I detest paying for knitting and sewing patterns. I do pay for them, but only as a last resort.

There were some cool knit/crochet patterns available online, but then it hit me: have old pants…bingo! Instant yoga bag. Well, okay, not exactly instant, but you get my drift.

I love loose fitting pants, which meant a little more work for me. But you could simply go to a charity shoppe (ie. The Salvation Army) and get a pair of size 8 jeans, or even children’s-size pants, that you think are funky. Go on, it’ll cost you about $3, a lot less than a yoga bag. ;)

The pants that I chose were army greenish, my favorite color, and had loads of funny pockets everywhere. I forgot to take a “before” photo of the pants, but their shredded remains in my craft drawer sit in evidence of the fact that they once were pants. :P

“When you inhale, you are taking the strength from God. When you exhale, it represents the service you are giving to the world.”
~B.K.S. Iyengar, Yogini

Homemade Yoga Bag

Now, on to the process of going from pants to yoga stance…

    Homemade Yoga Mat Bag

    Supplies:
    -A Yoga mat
    -Old, unwanted pair of pants
    -Long belt that you can sew through (I chose canvas)
    -Shoelace or elastic cord, for drawstring
    -Round paper template, slightly bigger than a rolled yoga mat
    -A good sturdy needle (especially if you are sewing through jeans)
    -Thread in a matching or beautifully contrasting color
    -Scissors
    -Sewing pins
    -*Patience*

1. Roll your yoga mat up, but not TOO tightly.

2. Decide which pant leg you’d like to use. (Mine were different from each other, so I chose the one with cooler pockets.)

3. Slide the yoga mat into the pant leg from the bottom end of the pants and see if you like how tight/loose the fit is. Also mark the length that you’d like the bag to be, adding an extra inch or two for seams.

4. Remove the mat from the pants and cut the leg that you want to the appropriate length.

NOTE: The less of the original pant seam that gets included in the portion you are using, the better. IE. Try not to have crotch or back pocket seams over the portions you will be sewing through.

5. If you think that the fit of your bag is too loose, which is most likely the case with adult pants, then cut the inner seem of the pant leg and, using your rolled mat as a template, wrap the pant leg around the mat (inside out) and pin the sides together about two inches away from the mat edge (or more, for ease of removing the mat.) I wanted a snug-fitting bag so I did 2 inches, but it is a bit of a struggle to get the mat in and out so I suggest going with 3 inches. :)

6. Now you must sew up and down that pin line twice. I sewed my bag by hand so, using doubled thread, I sewed one seam close to the pins and then followed back up with a separate, second seam about a 1/4 inch out from the first.

7. If you are adding a drawstring, leave the top 1.5 inches of this seam unsewn.

8. For drawstring, turn in the edges of these unsewn portions and sew a little hem on them, so that they won’t fray when you pull your drawstring in and out.

9. Roll this top bit over to create an open channel wide enough for your lace to pass through and sew it down. Make sure to have a nice sturdy stitch line.

10. Create a round template for your bag bottom using one of these two methods: Find a plate that is just slightly bigger than your rolled yoga mat and use that, or flatten the pant leg and measure the length across the bottom of the leg then add a little bit for seam allowance, this will be the circumference of the paper circle that you need to cut out.

Papa Modeling the Recycled Yoga Bag

11. Once you have your circle-shaped piece of fabric (which does not HAVE to be the same fabric as the rest of the bag) you want to pin it to the bottom of the bag. With the right sides together, start by pinning it at the four corners and then working on the pins between each quarter section. You will most likely find that you need to do some small finger tucking (or pleating) to make the circle attach properly. (I fiddled with the pleats and pins for nearly an hour to get it perfect.)

NOTE: If your circle is far too big and you use it anyway, the bottom of your bag will look like an upside-down mushroom. I had to take it apart once for that very reason. ;)

12. Sew the bottom on with a double seam.

13. Turn the bag right-side out and find the proper length and placement for your belt/strap. I used pins to try several different placements and lengths before cutting the belt and sewing it in place. I laid the bottom end of the strap flat against the bag and turned the top end under a bit to make it hang nicer. *Remember to do this part with the mat IN the bag, you never know how the weight will effect where you want your strap.

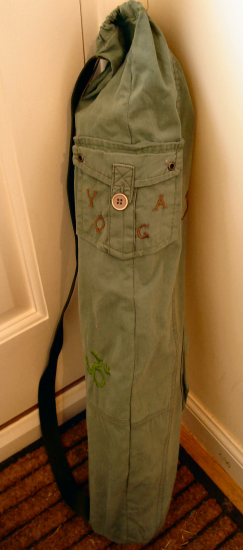
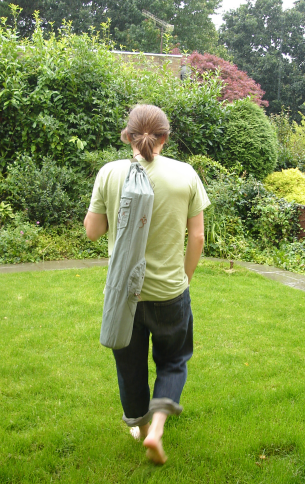
Now, if you have sewn on your strap, checked the strength of all your seams and threaded a drawstring through, you have a functionally complete yoga bag!!!

For fun you can add embellishments using embroidery, puff paint, sequins or patches. I took some extra pockets off of the jeans with a seam ripper and sewed them to my completed bag so I can now carry my wallet, house keys and yoga socks. I also added some embroidered om symbols, the word “YOGA” and am planning a little Buddha, once I draw out the design in a form that I am happy with.

Have fun with your new yoga bag!

Namaste. :)

“Live each season as it passes; breathe the air, drink the drink, taste the fruit, and resign yourself to the influences of each.”
~Henry David Thoreau

Fully Stocked Fridge

So you’ve all had the chance to stock up on your dry goods and on your spices & flavourings, now we get to delve into my favorite place…the fridge. This is where most folks keep all of their fresh fruits & veggies, which you should be indulging in at every meal if you’re being a healthy vegetarian.

I love to go to the local market and savor the organic produce as well as other people’s homemade jellies and preserves. And I always buy organic, wherever possible, because modern large-scale farming douses our foods in chemicals, strips the soil of most of the nutrients and therefore produces a substandard, nutritionally deficient crop.

Local farmers markets and small whole foods shops always carry a variety of whatever is in season as well as some responsibly grown imports. Plus you can often get more information in the form of pamphlets, or actual conversation, from the people who grow your food.

When it comes to the freezer, the vegetarian kitchen doesn’t always require a whole lot of freezer space. But a few staples are good to keep around.

As much of what you keep in the fridge is fresh and perishable, I am not suggesting that you keep ALL of what is listed below in your fridge at all ties. Instead just considered some of the suggestions that I make, experiment for yourself and keep those things that you use most regularly. They say that if you have all of the colors of the rainbow in a dish, such as salad or stir-fry, then that is the most healthy way to eat your fruits & veg. (This means, for veggies, Red-Green-Orange-Yellow-White.)

As for the lists below, these are just the frequent residents of our fridge/freezer, what you keep around may be different. Our selections vary according to season. We love to have fresh berries in summer, corn-on-the-cob in the autumn and Papa prefers sauerkraut in the winter. My fridge also has lots of condiments in it, I guess those could also have been listed with the flavourings post, but I’ve put them here because that is where they are stored.

Have fun and let me know if you have a favorite item that you don’t see on the list. :)

    The Vegetarian Fridge/Freezer

    Preserves:

    Apple Sauce
    Strawberry Jam
    Grape Jelly
    Marmalade
    Salsa
    Pickles
    Sauerkraut (Papa loves this stuff.)

    Condiments:

    Ketchup
    Mustard
    Relish
    Chutney (I like Mango Chutney.)
    Sweet Chili Sauce
    Nama Shoyu- Soy Sauce
    Rice Wine
    Cooking Sherry
    Homemade Salad Dressings

    Vegetables:

    Romaine Lettuce
    Tomatoes
    Large Onions
    Green Onions (Spring Onion)
    Red Bell Pepper
    Green Bell Pepper
    Mushrooms (Assorted)
    Celery
    Cucumbers
    Zucchini
    Broccoli
    Carrots
    Potatoes
    Cauliflower
    Green Chillis
    Corn-on-the-Cob
    Butternut Squash
    Avocado
    Snap Peas
    Green Beans
    Bean Sprouts

    Fruits:

    Oranges
    Grapes
    Kiwis
    Pears
    Apples
    Cherries
    Bananas
    Strawberries
    Blueberries
    Plums
    Apricots
    Nectarines

    Liquids:

    Soy Milk (Regular)
    Soy Milk (Vanilla)
    Rice Milk
    Apple Juice
    Orange Juice
    Cranberry Juice
    Spring Water
    Homemade Iced Tea

    Other Fridge Items:

    Tofu (silken)
    Tofu (firm)
    Peanut Butter
    Cashew Butter
    Eggs (if you eat them)
    Garlic cloves
    Ginger Root
    Soy Yogurt

    Freezer Items:

    Ice Cubes
    Vegetarian Sausages
    Vegetarian Hot Dogs
    Veggie Burgers (a selection of them)
    Frozen Veggie Mince (faux ground beef)
    Frozen Veggie Pot Pies
    Frozen French Fries
    Vegan Ice Cream (chocolate or vanilla)
    Italian Ice (I like strawberry flavour.)

“Soup puts the heart at ease, calms down the violence of hunger, eliminates the tension of the day, and awakens and refines the appetite.”
~Georges Auguste Escoffier, French Chef

Vegan Chicken Noodle Soup

This recipe is just what it says!

Got a cold? This stuff has as much (actually more) protein in it as Mom’s Homemade Chicken Soup, minus the chicken!

And, with the antibiotic properties in the onions, you’ll be right as rain in no time.

It tastes so close to the real deal, folks would have a hard time telling the difference. :)

    Vegan “Chicken” Noodle Soup

    Ingredients:

    4-6 cups of water
    1-2 celery stalks, slivered
    3 medium mushrooms, chopped
    3 cloves garlic, sliced fine
    1 medium onion, diced
    1 large carrot, cut in rounds
    1 package firm tofu, cubed OR
    1 package vegan “chicken” cutlets, cut in chunks
    1 tsp thyme
    pinch of ground cumin
    1-2 tsp Italian seasoning
    2-3 cubes vegetable bullion
    2 large bay leaves
    1 tbsp sea salt
    2 handfuls of pasta, I use rotini shape
    6-8 tbsp of nutritional yeast OR
    2 cups of “No-Chicken” broth
    1/2 tsp black pepper (or to taste)

1. Cut tofu in small cubes and fry in olive oil until slightly browned.

2. Marinade tofu in 1 cup water with salt and 3 tbsp dissolved yeast flakes, or in 1 cup of “No Chicken” broth, for 2-3 hours.

3. Heat the rest of the water with the remaining “No Chicken” broth or yeast flakes, until simmering.

4. Add the onions, spices and carrots, continuing to simmer.

5. Once tofu has finished marinating, add it to the soup pot.

6. Let tofu simmer in the broth for 35-45 minutes and then add any remaining vegetables.

7. Let the completed soup simmer until all veggies are cooked thoroughly, throwing in the pasta about ten minutes before serving.

8. Remove the bay leaves from the pot, add more salt and flavorings to taste.

9. Serve with a nice artisan bread and some cool iced tea.

* You can add other veggies such as broccoli, asparagus or corn kernels, if that’s how your Mom made it. ;)

Bon Appetit and Get Well Soon!!!

“Self-education is the most important thing you can do to protect yourself, cut medical bills, and live a healthier and happier life.”
~Walt Stoll, M.D.

Making Tinctures

I recently wrote a post about the multiple uses of Stinging Nettle and I thought that it would be a good idea to follow that up by introducing you to some ways of making your own herbal medicines at home.

By far the most well-known and popular way of taking herbs is as a tea. But a very close second is the use of herbal tinctures.

A tincture is an alcoholic or acidic extract of an herb, used to concentrate the herb’s potency in a non-volatile and ingestible liquid that can be preserved for a long period of time before use.

Tinctures are often made with herbs gathered fresh in the wild, though a tincture made from a dried herb is also medicinally of high potency.

Always store tinctures in a dark, glass container to keep them pure protect them from premature degradation via sunlight. Many people keep tinctures in a dosage bottle with a squeezable dropper-top, as this makes for easier administration to the patient.

Treatment can safely be assumed to be one-dropper full 2-3 times per day. You can mix the tincture with water, juice or tea to lessen the bitter taste.

Herbal tinctures can be made in any good sized glass jar, a pickle jar is ideal. Herbs tend to be sold by the ounce and you need enough to fill your tincturing jar half way. I usually use either one or two cups. For smaller batches you can use as little as four tablespoons full.

Tinctures can be made from virtually any non-toxic herb and also from a mixture of herbs for the purposes of treating either general or very specific ailments. *Making a tincture using a powdered herb can be quote frustrating and messy, but it is doable with a bit of perseverance and patience.

It is typical to use either vodka or white vinegar as the extractive compound. The preference is really just based on taste, choose whichever one you wish.

Always buy your dried herbs from an organic source if possible and, when using fresh herbs, always be sure that you are collecting your medicinals from a location that is at least 15 feet from any roadway.

For the sake of example, we will say that we’re making a tincture of St. John’s Wort. St. John’s Wort is an excellent immune booster and has been proven to successfully treat even the most severe cases of depression. You can collect it’s yellow flowers from early-June to early-July in the northern hemisphere. (You need to collect A LOT of them.)

    Tincturing Herbs

    Ingredients:

    Clean glass jar with a tight-fitting top
    2 cups of fresh or dried St. John’s Wort flowers
    2 cups of vodka or white vinegar *or enough to completely cover your herbs in the jar
    A dark, cool storage place
    A piece of loose-weave muslin cloth or cheesecloth
    An elastic
    Smaller, storage bottles (with or without dropper tops)

1. Measure out your herbs and place them in the jar.

2. Pour in enough vodka/vinegar to completely cover the herbs. (Ratio tends to be 1:1)

3. Tightly cap the jar and shake it a bit. Label the jar with the contents and a date one-month into the future.

4. Place the jar right-side up in a dark, cool cupboard (not in the fridge.)

5. Write in your calender to shake and flip the jar in 14-days.

6. At one-month, remove the jar from the cabinet and strain by placing the cheesecloth over the top of the jar and securing it with an elastic band.

7. Pour the strained contents into a spouted measuring cup and then fill your dosage bottles.

8. Always label each bottle with the contents and date of expiry, usually two years in the future.

~ Don’t worry, be healthy :)

“Variety’s the very spice of life, that gives it all its flavor. ”
~William Cowper, 18th-Century Poet

Veggie Cupboard

Now that we have talked about dry goods, in Stocking Up: The Vegetarian Dry Cupboard, we should look at what items you use to spice up your dishes. There are many different choices out their for flavourings but I will just highlight the most commonly used items in basic vegetarian cooking.

As they hail from so many different regions around the world, spices, herbs and sauces can be used to make a dish seem exotic and rare or familiar and comforting. Using a different combination of flavours, you can make the same dish taste entirely different, thus making your recipe collection even larger and more versatile.

The more flavours, spices and such that you keep around, the easier it will be to come up with an original meal at a moment’s notice. So, try new flavours often and keep a fully stocked spice rack at all times. You can be frugal in which ingredients you choose to keep in your stock, but always supplement by being generous with your investment in herbs and spices, etc.

    Spices, Flavourings and Sauces

    Oils

    Walnut Oil
    Olive Oil
    Basil Oil
    Coconut Oil
    Sesame Oil
    Peanut Oil
    Sunflower Oil

    Flavourings

    Yeast Extract
    Malt Extract
    Nutritional Yeast
    Vegetable Bullion
    Onion Broth

    Vinegars

    Cider Vinegar
    Rice Vinegar
    Balsamic Vinegar
    White Vinegar
    Red Wine Vinegar

    Sauces

    Peanut Sauce
    Stir Fry Sauce
    Sweet Chili Sauce
    Soy Sauce (or Nama Shoyu)

    Herbs

    Thyme
    Sage
    Parsley
    Mint
    Basil
    Rosemary
    Oregano
    Lemongrass
    Bay Leaf
    Lavendar
    Summer Savory
    Tarragon
    Celery Seed
    Marjoram
    Chives

    Spices

    Turmeric
    Nutmeg
    Saffron
    Curry
    Anise Seed
    Vanilla Pods
    Cumin
    Garam Masala
    Cinnamon
    Allspice
    Whole Cloves
    Ground Cloves
    Chinese 5-Spice
    Ginger
    Garlic
    Chili Powder
    Cayenne Pepper
    Paprika
    Mustard

    Other Ingredients

    Honey
    Lemon Juice
    Vanilla Extract
    Agave Syrup
    Maple Syrup
    Rose Water
    Raw Sugar
    Corn Starch
    Raw Cacao Powder
    Baking Soda
    Baking Powder
    Baker’s Yeast

    ~

    There are so many more flavourings, spices and sauces out there. I have only mentioned a few of the most common. With at least half of these in your cupboard you will be able to quickly whip up, or experiment with, the bulk of vegetarian recipes that you find online or in a cookbook.

    Have fun. Be spicy!

« Prev - Next »