Frugal Craft: Homemade Yoga Mat Bag
August 20th, 2008 by Mama
If you're new to this blog, you may want to subscribe.
Thanks for reading Vegetarian Frugal Housewife!

A few months ago I took up yoga, and have so far observed many things about it and about myself. I won’t bore you with the details.
There are two things that apply widely though: you have muscles that you have never dreamed of in places you’ve never felt. And, going with the modern, “women’s magazine,” trendy variety of yoga can be costly. You don’t need ocean views and spa retreats to connect with yourself. :)
In taking up yoga there is some expense involved. The things that you supposedly need are a mat and (if you’re not very flexible) a yoga block, a yoga strap and a bolster cushion. You also need comfy pants, non-slip socks and a tank top. Some of these things I had, some I had to buy (luckily my birthday passed around the same time and I got some nice yoga-related gifts.)
The one thing I did not have was a yoga mat bag. And, being the crafty chick that I am, I decided that I should make one myself. I decided this despite all the ultra-funky and unique yoga mat bags that are available out there.
Now, once I decided to make the bag I set about looking online for a pattern. I’m a frugal girl. I detest paying for knitting and sewing patterns. I do pay for them, but only as a last resort.
There were some cool knit/crochet patterns available online, but then it hit me: have old pants…bingo! Instant yoga bag. Well, okay, not exactly instant, but you get my drift.
I love loose fitting pants, which meant a little more work for me. But you could simply go to a charity shoppe (ie. The Salvation Army) and get a pair of size 8 jeans, or even children’s-size pants, that you think are funky. Go on, it’ll cost you about $3, a lot less than a yoga bag. ;)
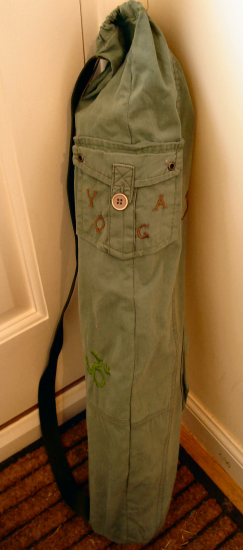
The pants that I chose were army greenish, my favorite color, and had loads of funny pockets everywhere. I forgot to take a “before” photo of the pants, but their shredded remains in my craft drawer sit in evidence of the fact that they once were pants. :P
“When you inhale, you are taking the strength from God. When you exhale, it represents the service you are giving to the world.”
~B.K.S. Iyengar, Yogini

Now, on to the process of going from pants to yoga stance…
- Homemade Yoga Mat Bag
Supplies:
-A Yoga mat
-Old, unwanted pair of pants
-Long belt that you can sew through (I chose canvas)
-Shoelace or elastic cord, for drawstring
-Round paper template, slightly bigger than a rolled yoga mat
-A good sturdy needle (especially if you are sewing through jeans)
-Thread in a matching or beautifully contrasting color
-Scissors
-Sewing pins
-*Patience*
1. Roll your yoga mat up, but not TOO tightly.
2. Decide which pant leg you’d like to use. (Mine were different from each other, so I chose the one with cooler pockets.)
3. Slide the yoga mat into the pant leg from the bottom end of the pants and see if you like how tight/loose the fit is. Also mark the length that you’d like the bag to be, adding an extra inch or two for seams.
4. Remove the mat from the pants and cut the leg that you want to the appropriate length.
NOTE: The less of the original pant seam that gets included in the portion you are using, the better. IE. Try not to have crotch or back pocket seams over the portions you will be sewing through.
5. If you think that the fit of your bag is too loose, which is most likely the case with adult pants, then cut the inner seem of the pant leg and, using your rolled mat as a template, wrap the pant leg around the mat (inside out) and pin the sides together about two inches away from the mat edge (or more, for ease of removing the mat.) I wanted a snug-fitting bag so I did 2 inches, but it is a bit of a struggle to get the mat in and out so I suggest going with 3 inches. :)
6. Now you must sew up and down that pin line twice. I sewed my bag by hand so, using doubled thread, I sewed one seam close to the pins and then followed back up with a separate, second seam about a 1/4 inch out from the first.
7. If you are adding a drawstring, leave the top 1.5 inches of this seam unsewn.
8. For drawstring, turn in the edges of these unsewn portions and sew a little hem on them, so that they won’t fray when you pull your drawstring in and out.
9. Roll this top bit over to create an open channel wide enough for your lace to pass through and sew it down. Make sure to have a nice sturdy stitch line.
10. Create a round template for your bag bottom using one of these two methods: Find a plate that is just slightly bigger than your rolled yoga mat and use that, or flatten the pant leg and measure the length across the bottom of the leg then add a little bit for seam allowance, this will be the circumference of the paper circle that you need to cut out.

11. Once you have your circle-shaped piece of fabric (which does not HAVE to be the same fabric as the rest of the bag) you want to pin it to the bottom of the bag. With the right sides together, start by pinning it at the four corners and then working on the pins between each quarter section. You will most likely find that you need to do some small finger tucking (or pleating) to make the circle attach properly. (I fiddled with the pleats and pins for nearly an hour to get it perfect.)
NOTE: If your circle is far too big and you use it anyway, the bottom of your bag will look like an upside-down mushroom. I had to take it apart once for that very reason. ;)
12. Sew the bottom on with a double seam.
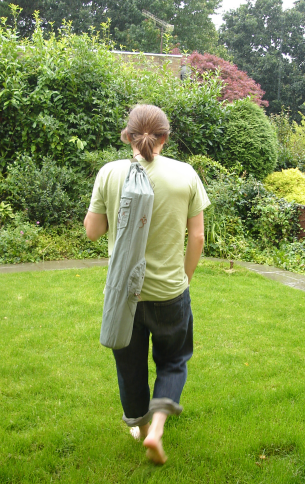
13. Turn the bag right-side out and find the proper length and placement for your belt/strap. I used pins to try several different placements and lengths before cutting the belt and sewing it in place. I laid the bottom end of the strap flat against the bag and turned the top end under a bit to make it hang nicer. *Remember to do this part with the mat IN the bag, you never know how the weight will effect where you want your strap.
Now, if you have sewn on your strap, checked the strength of all your seams and threaded a drawstring through, you have a functionally complete yoga bag!!!
For fun you can add embellishments using embroidery, puff paint, sequins or patches. I took some extra pockets off of the jeans with a seam ripper and sewed them to my completed bag so I can now carry my wallet, house keys and yoga socks. I also added some embroidered om symbols, the word “YOGA” and am planning a little Buddha, once I draw out the design in a form that I am happy with.
Have fun with your new yoga bag!
Namaste. :)

Pingback: The Crafty Cupcake Celebrates Earth Day «()
Pingback: 28 DIY Gifts for Any Budget (or the Hipster-Inclined) | Greatist()
Pingback: 23 DIY Gym Equipment Projects to Make at Home | Greatist()
Pingback: Fly Spear | 21 DIY Gym Equipment Projects to Make at Home()