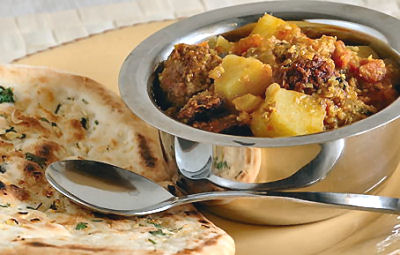
Subscribe to
Posts
Comments

Tasty Thai Butternut Soup

Thai Butternut Soup

Seems like years, actually over a decade, since I first tried Thai food and swore up hill and down dale that I would learn to cook it.

There are several cookbooks on my shelf as a testament to my good intentions about learning to make Thai food at home.

Yet nothing ever came of it. Until now.

After having a couple of nice Thai meals with Papa on my visit to Toronto, and forming some nice sweet memories of those walks together around the Asian neighborhood near Dundas St., I wanted to try and recreate one of those recipes at home.

The outcome was very pleasurable. Papa said that he liked it even better than the soup we had at the restaurant. So I’ve decided to pass the recipe along to you.

    Tasty Thai Butternut Soup

    Ingredients:

    1 large Butternut Squash OR
    1 medium-small Pumpkin
    1 cup coconut milk
    4 cups vegetable broth
    1 medium shallot or onion
    1/2 cup applesauce
    1/8 cup fresh shredded ginger pieces
    1/8 cup lemon or lime juice
    1 cup soy cream
    5 tblspn honey
    3 tblspn olive oil
    2 bay leaves
    1 1/4 tsp curry powder
    2 tblspn sea salt
    1 tblspn (or 1 clove) chopped garlic
    1/2 tsp cinnamon
    1/4 tsp nutmeg
    1/2 tsp garam masala
    pinch cilantro
    pinch chili powder

* You will need a blender or food processor for a smooth soup. *

1. Dice shallots and squash.

2. Saute shallots and garlic in olive oil until shallots soften.

3. Add all liquid ingredients (except honey) to the pot and simmer for 5 minutes over medium heat.

4. Add honey, bay leaf and spices along with squash chunks.

5. Cook for 15-20 minutes over med-low heat until squash is soft.

6. Using an extra pan, pour portions of the soup into a blender and puree.

7. Replace pureed soup into pan and test for flavor. Respice if necessary.

8. Serve with bamboo shoots or a couple of mint leaves for garnish.

~

This sweet and spicy soup is delicious for a warmer-upper on cool autumn evenings. If you are so inclined you could prepare some Thai Veggie Rolls with chili dipping sauce as a side dish.

When serving, I like to use nice Asian-inspired serving dishes and renge spoons.

A little bit of Thailand right in your very own dining room! :D

If you enjoyed this post, perhaps you'd like to buy me some tofu or make a tip jar donation.

Deadhead Zucchini Bread

I don’t know about you all out there but I absolutely LOVE zucchini bread. That’s one of my favorite things about autumn, all the zucchinis waiting for me to use them up.

There is just something so cool about turning a bright green veggie into a nice, moist, sweet bread.

Basket of Zucchinis

I figure that Deadheads are also called hippies and the Green Party is consider to be the “hippie” party and since being “Green,” to me, is a sweet thing just like my bread, it isn’t so far-fetched to call this a Deadhead Bread.

Not that I am dead in the head, but there is something about the music of the Grateful Dead that brings a smile to my face and makes life seem just a little bit brighter.

The bread is kinda messy to make but all things worth having are worth working for, right?

This recipe makes two good-sized loaves or several smaller loaves.

Papa thinks I should call it zucchini “muffins” or zucchini “cake” because it is so darned yummy. I have been accused of this recipe originating from the Devil, because it turns even the kindest people into greedy, gluttonous beasts! But hey, the Dead said A Friend of the Devil is a Friend of Mine. ;)

I hope that you all like this bread a lot! Be angelic and share some with your loved ones!

    Deadhead Zucchini BreadVegetarian

    Ingredients:

    3 cups of organic flour
    3 cups of freshly shredded zucchini
    2 cups turbinado sugar (or white sugar if you insist)
    3 eggs
    3 tsp cinnamon
    1/2 tsp baking powder
    1 1/2 tsp baking soda
    1 tsp salt
    1 cup oil (or 1 1/4 cups butter)
    1/8 tsp ginger
    1/2 tsp nutmeg
    1/8 tsp ground cloves
    1/2 tsp allspice
    1/2 tsp pumpkin pie spice

    optional:

    2/3 cup raisins or
    2/3 cup chopped walnuts

1. Preheat oven to 325°.

2. Combine all wet ingredients in one mixing bowl.

3. Combine all dry ingredients in a larger mixing bowl. (Leaving raisins or nuts on the side.)

4. Fold wet ingredients into dry ingredients until thoroughly combined.

5. Place mixture evenly in greased baking pans.

6. Bake on the middle rack of the oven. 50 minutes to 1 hour is sufficient for two large loaf pans.

7. Cool until able to remove from pans without breaking.

8. Cut and serve alone or with yummy melted butter on top!!!

~

“Good food is the secret to great health” -housewife, 2007

If you enjoyed this post, perhaps you'd like to buy me some tofu or make a tip jar donation.

Miss Lilac’s Bean Chili

This one comes from my old friend Lilac. Actually it made the rounds throughout her family, so I guess it isn’t technically “hers” so to speak.

Rainbow Gathering 1998, School Bus

They are an interesting bunch. If you can picture old school hippie beings who were raised on falafel, traveled the country in decorated school buses and were simply born with the crafting gene (one painter, one jeweler and one potter in the family) then you’ve got it just about right.

I’ve tweaked the recipe a bit for my own personal tastes. This makes a chili that is both sweet and spicy, just the way that I like it!

So without further adieu…

    Miss Lilac’s Veggie Bean Chili

    Ingredients:

    2 large onions (diced)
    4 cups of kidney or black beans (cooked or canned)
    1-2 medium green or red peppers (diced)
    2 cups of tomatoes (canned or chopped fresh)
    1-2 tablespoons sea salt
    2 tablespoons olive oil
    2 cloves of garlic (chopped small or pressed)
    1 package of Lightlife Smart Ground (taco flavor)
    OR 1 package of Quorn Grounds (I prefer these.)
    1/4 tsp cayenne
    2 1/4 tsp chili powder
    1 tsp ground cumin
    1 tsp oregano
    1/4 tsp curry powder
    1/8 tsp nutmeg (+ a pinch)
    1/8 tsp cinnamon (+ a pinch)
    1 teaspoon black pepper
    1 tablespoon brown sugar (or turbinado sugar)

1. Saute the garlic in the olive oil over med-high heath for a minute then add the onions and saute until they soften.

2. Add the spices and continue cooking for one minute.

3. Add the package of Smart Ground and fry until it is warm and broken up evenly.

4. Add the remaining ingredients to the pan and bring to a simmering boil.

5. Cover. Reduce heat to lowest setting and simmer for 30 minutes or more, until consistency and flavors are to taste.

6. Serve with organic tortilla chips and enjoy!

If you enjoyed this post, perhaps you'd like to buy me some tofu or make a tip jar donation.

Misadventures in Soap Recycling

That’s right. This post was going to be titled Shred & Pour: Recycling Soap Ends, but the universe had other ideas.

What was to be a simple exercise in melting those little pieces of unusable soap that are left over at the end of the bar turned into an exercise in frustration and stinky kitchens.

My grandmother always used to save those useless ends of soap and put them into a bowl. Then she would add little sprinkles of water and press down on the mixture now and then, allowing the soap ends to sort of cream together. It was then possible to put your hand into the bowl and scoop out enough soap to wash your hands with.

A few years ago I decided that I would do the same but, having recently discovered soap-making, I though that I would melt all of those little pieces of soap together and pour the mixture into new soap molds.

Beginning Soap Supplies

All I can say is that it worked fine last time, the result being cute little bars of pastel green soap with tiny chunks of other solid colors mixed in.

This time….well I’ll get to that.

So here were the original instructions that I was going to give you……DON’T FOLLOW THESE!!!


    Recycling Soap Ends

    Supplies:

    Soap ends from old bars of soap
    Soap molds
    A Double-boiler or
    a microwave-proof glass measuring cup with pour spout
    Scented oil (such as amber, patchouli or sandalwood)
    Food coloring (if desired)
    Cheese grater
    Metal spoon

    Instructions:

    1. Grate soap ends as small as possible using the cheese grater.

    2. Place soap ends into the top of the double boiler so that they fill a little less than half the pan.

    Alternately, place them in the measuring cup to the same height.

    3. Add three drops of scent and one drop of food coloring.

    4. Heat over double boiler (or in microwave) at low heat until the soap becomes liquid. IT WILL BE HOT!!!

    5. Stir a little, pour or spoon into molds.

    6. Place into fridge to harden.

UNFORTUNATELY, I don’t have a double-boiler and although, in theory, you can create one simply by placing a smaller pan inside of a larger pan. I have discovered that this doesn’t work well when the pans have insulated bottoms, as all of my pans do. So I opted for the microwave method.

Disaster struck!

The whole mixture smoked something awful in the microwave, and still I persevered.

I kept cooking and cooking, waiting for the melt.

I added a few drops of water and it seemed to initiate a melt.

I removed and stirred to break up the chunks and still had to cook more.

Sad Soap Results

I eventually got a brown gooey mess that resembled melted soap and so proceeded to pour it into the molds (which I had borrowed from someone.) There it proceeded to melt right through the pretty shapes and onto my counter.

‘nough said?

I tried to pour the last bits into metal mold shapes, but they smelled so burnt that I had to throw them away. Ahhh…frugality gone wrong…

So my new directions are:

Add the soap ends to store-bought glycerin soap chunks that are specifically designed for microwave soap-making and make sure to use a soap thermometer. Either that or get some metal molds, because those plastic soap molds and soap end recycling simply do not mix!

Oopsy, oh well. ;) I’m off to buy replacement molds.

If you enjoyed this post, perhaps you'd like to buy me some tofu or make a tip jar donation.

Sweet Root Veggie Cornucopia

Looking for a good Autumn recipe to try on your friends and family?

This is one that I mashed together with features from several different sources and a little of my own addition for inspirations’ sake.

It will work as a main course for any die-hard vegetarians but also makes a lovely side-dish to a larger meal (such as Thanksgiving Dinner.)

    Sweet Root Veggie Cornucopia

    Ingredients: (Items marked with an asterisk are optional)

    1 Butternut squash
    4 large Potatoes
    5 Shallots
    1 large or 2 medium Turnips
    5 Parsnips
    5 Carrots
    *2-3 Apples
    *2-3 pieces Celery
    1 cup Maple Syrup
    1/2 cup Olive Oil
    1/2 teaspoon Cinnamon
    1/2 tablespoon Garlic
    large pinch Nutmeg
    *1/4 teaspoon Cayenne
    *pinch Paprika
    1 tablespoon Salt
    1 teaspoon Black Pepper

1. Preheat oven to 450° Fahrenheit, oil a roasting pan or baking dish. (I used a very large lasagna pan. But an earthenware casserole dish would do quite nicely.)

2. Cut all veggie into 1/2 inch rounds or 1 inch chunks. Peel any veggies that you wish to peel, I suggest peeling the squash, the apples and the turnip but not everyone prefers this.

Root Vegetables

3. Combine all veggies and fruit in a large mixing bowl, or in your baking dish if its large enough to allow mixing, then drizzle both the maple syrup and olive oil over the top.

4. Toss veggies several times to ensure that all surfaces are glazed.

5. Sprinkle the herbs and spices over the top and mix thoroughly.

6. Place the entire combination in pan and bake for about an hour, mixing every 15-20 minutes.

~

This recipe (which I made tonight) is very hearty and delicious.

Many of the other recipes for this type of baked veggie dish call for Rutabaga, which I for some reason detest, so I removed it. Though I replaced the Rutabagas with Butternut Squash, you can always include or exclude any veggies that you wish.

Go on! Be creative and have fun with your food!

If you enjoyed this post, perhaps you'd like to buy me some tofu or make a tip jar donation.

« Prev - Next »